To be honest, I never worked with iSCSI. After some questions, I had a closer look about the protocol. If you don’t have anything to do during a evening, you can read RFC 3720 and RFC 3721.
The first thing you will need if you want to have some hands-on with the protocol is to have some storage which supports iSCSI protocol. If you have a server with VMs running on it, you can easily have some basic Ubuntu images and create your own iSCSI Target. At the end of this blog you can find the iSCSI Terminology
iSCSI Linux Target and Initiator Config
For my own convieniance, I post not only the screenshots with results, but also the commands, so it is easier to copy-paste. (Yes, I am lazy).
I used two Ubuntu images and installed the following packages on it :
On the Target Image :

sudo apt install targetcli-fb
sudo apt install lvm2
On the Initiator Image :
sudo apt install open-iscsi
On the target I created already a Logical Volume. You don’t have to do it, but I was curious about the configuration.
Create a Physical Volume
Create a Volume Group.
Create a Logical Volume
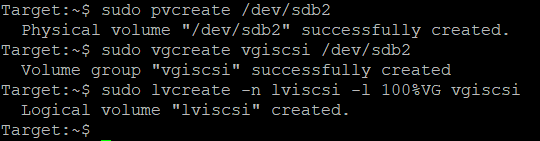
sudo pvcreate /dev/sdb2
sudo vgcreate vgiscsi /dev/sdb2
sudo lvcreate -n lviscsi -l 50%VG vgiscsi
With the command :
lsblk
you are seeing all blockdevices of the OS.

Let’s start :
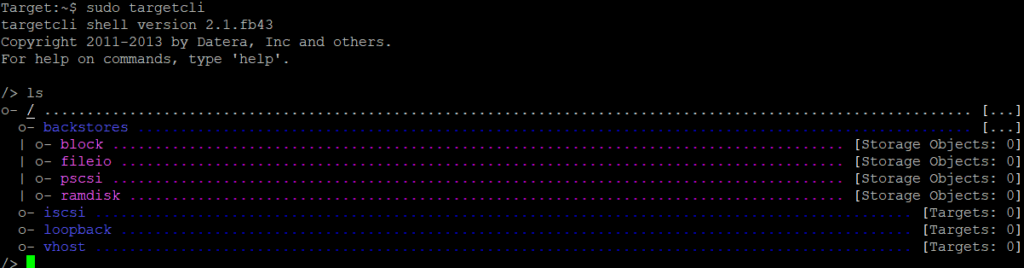
sudo targetcli
so that we can configure a Target on this image.
Within Targetcli we can do also some commands. With the TargetCLI command :
ls
we are seeing that nothing is configured yet.
If you have a config, you can clear it with :
cd /
clearconfig
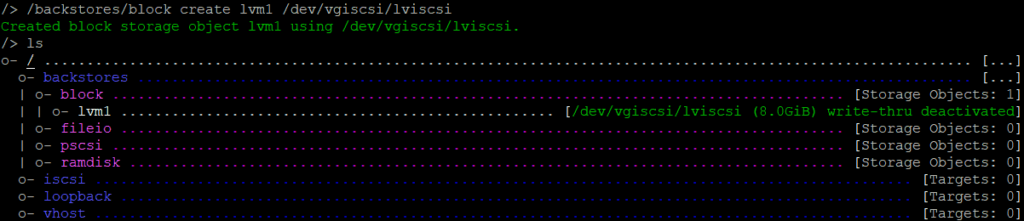
There are several options to create a backstore. First we are creating a block storage object.
With <tab> you don’t have to fill in the commands completely.
/backstores/block create lvm1 /dev/vgiscsi/lviscsi
If you do ls you can verify the command everytime.
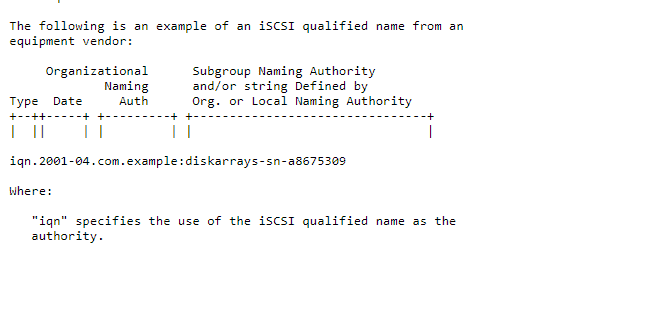
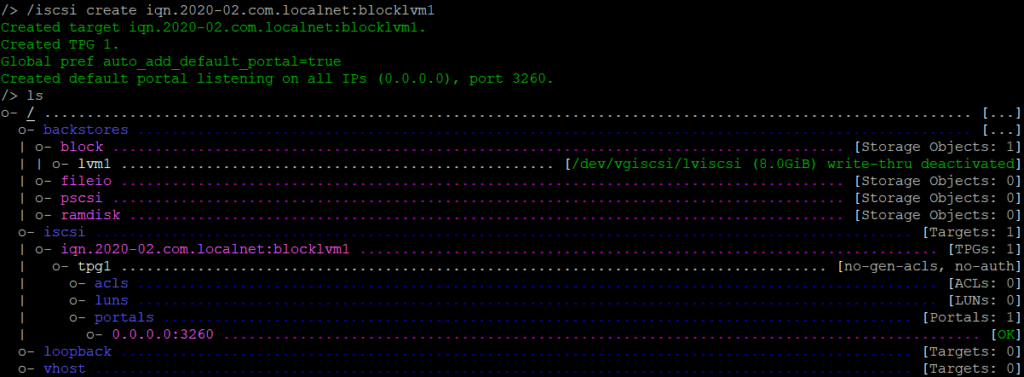
Now we have a block storage object. Create a target with a iqn name. IQN stands for iSCSI Qualified Name.
/iscsi create iqn.2020-02.com.localnet:blocklvm1
Before we going to configure the rest, I will have a closer look at the IQN. The IQN always start with iqn followed with a dot (.) and the year and month of when a company had the domain name. In this case you can have unique IQNs.
After the year, you see the domain name, but in reversed order followed by : and a name, serial number or whatever.
Example IQN:
iqn.2020-02.com.localnet:blocklvm1
2020-02 is feb 2020.
com.localnet is the domain localnet.com
and blocklvm1 is in this case the name of the storage. Could be anything what you think is easy.
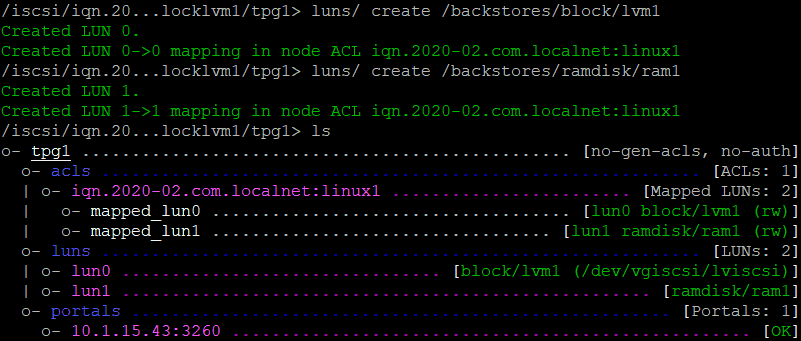
No we have a iqn name, we have to attach a lun.
cd /iscsi/iqn<tab>/tp<tab>
luns/ create /backstore/block/lvm1

Every initiator also has a unique iqn. It can have default values or you can change it. In this case I will just fill in some names and later I will change the initiator names.
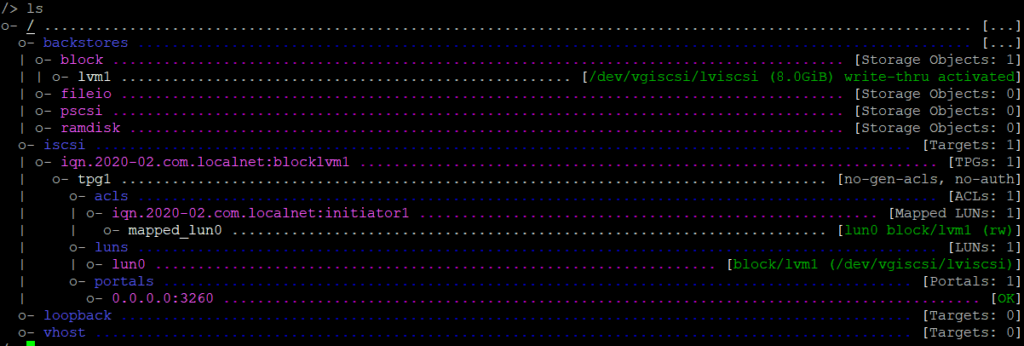
acls/ create iqn.2020-02.com.localnet:initiator1
ls

To have a overview what we configured you can do :
cd /
ls
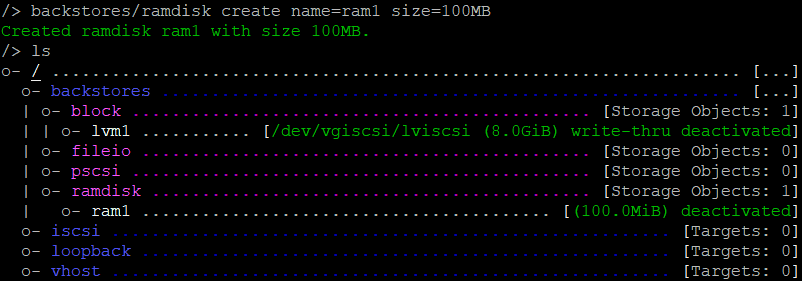
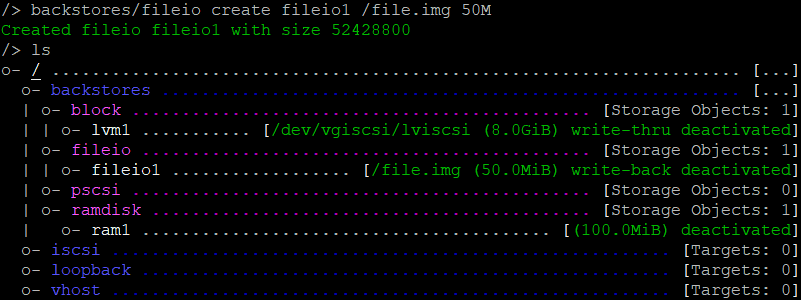
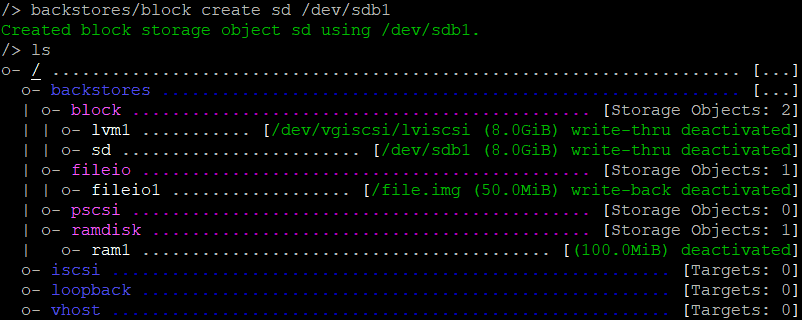
Here are some examples of creating backstores with RAM, File or Partition.
/backstores/ramdisk create name=ram1 size=100MB
/backstores/fileiocreate fileio1 /file.img 50M
If the file already exists it will use that size. If it isn’t there yet, it will create a file with the size you configured.
/backstores/block create sd /dev/sdb1
ls
Here you see all the backstores configured.
If you don’t configure the portal, it will default listen on all interfaces at port 3260.

You can change this, to first delete the default portal and then create a new one
portals/ delete 0.0.0.0 3260
portals/ create 10.1.15.43
ls
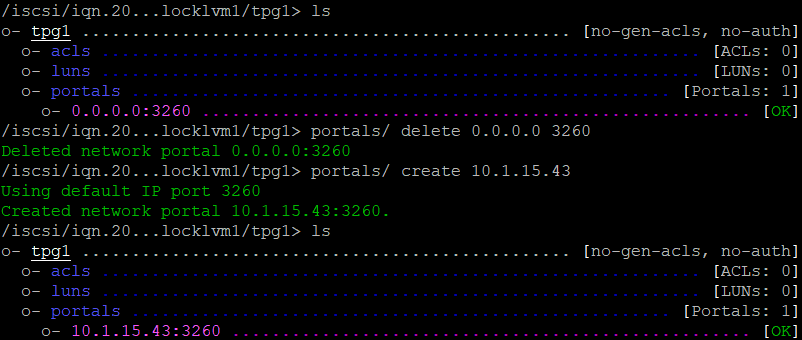
The config has changed a bit and now this is the result :
On the Initiator I can do a discovery of the Target :
sudo iscsiadm –mode discovery –type sendtargets –portal 10.1.15.43

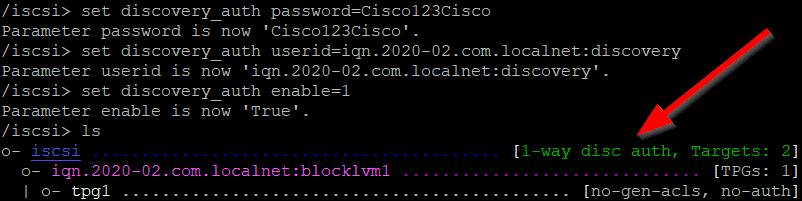
It is possible to have authentication on the discovery. Let’s enable it.
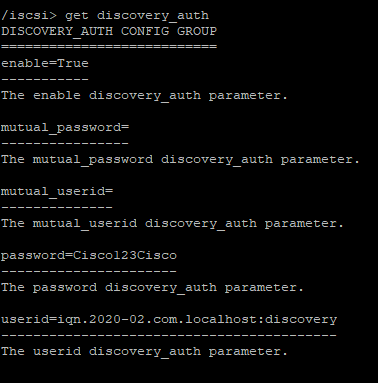
with get discovery_auth you can see all the parameters.
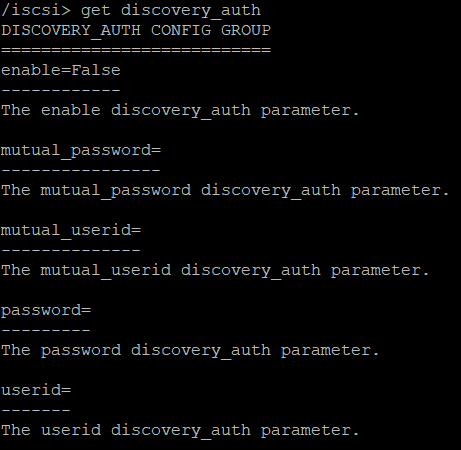
At the /iscsi level you can setup discovery authentication by :
set discovery_auth password=Cisco123Cisco
set discovery_auth userid=iqn.2020-02.com.localnet:discovery
set discovery_auth enable=1

Note : For Linux you can use weak passwords and a non iqn username. Windows don’t like it, thats why this password and username is chosen.
You can see that 1-way discovery authentication is enabled.
If you want to do a discovery at the Initiator, you will see a login failure:

At the Initiator you must change the file :
sudo vi /etc/iscsi/iscs<tab>
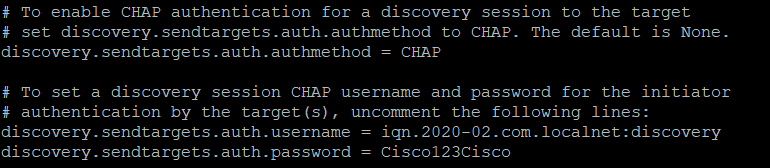
Restart the iscsi service at the Initiator
sudo systemctl restart iscsid.service
And now you can discover the Target on the Initiator.
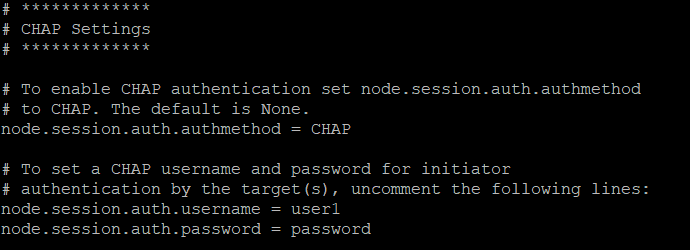
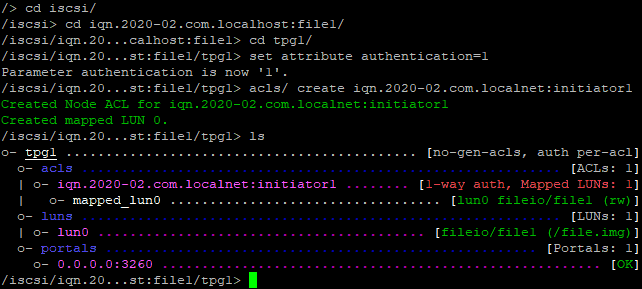
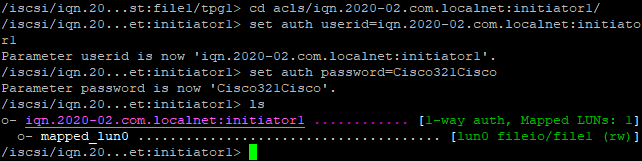
Let’s put authentication on the Target :
At the IQN level you see there is nothing configured yet :
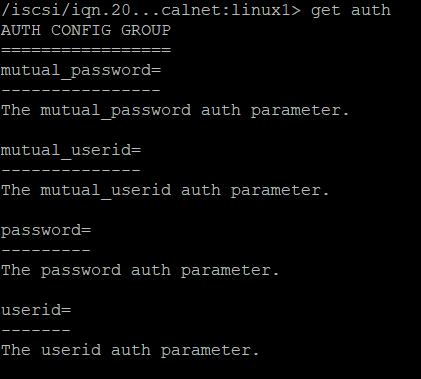
Let’s configure
set auth userid=user1
set auth password=password
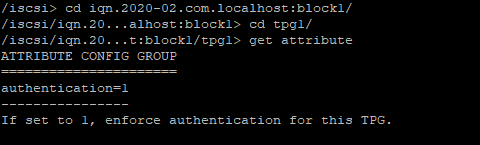
at the TPG level :
set attributre authentication=1
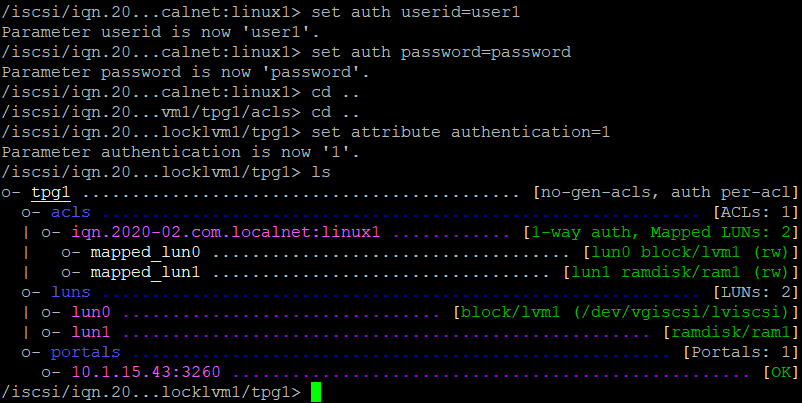
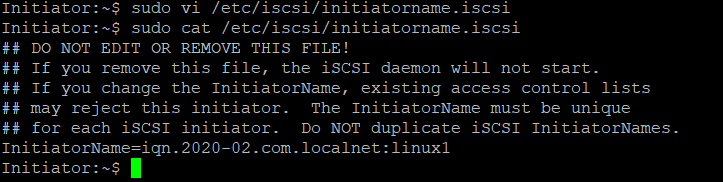
Because I just created an Initiator name at the Target, the Initiator name must be changed at the Initiator :
sudo vi /etc/iscsi/initiatorname.iscsi
Change the iscsi config file again and restart the service.
sudo vi /etc/iscsi/iscs<tab>
sudo systemctl restart iscsid.service
We can login at the Target via :
sudo iscsiadm –mode node –targetname iqn.2020-02.com.localhost:block1 –portal 10.1.15.43 –login

iSCSI Windows Initiator
When connecting a Windows Initiator to a Linux Target, you must remember a few things :
Usernames must be in IQN format.
Windows don’t like easy passwords. (RFC 3720 Recommendation)
You cannot have the same password for discovery and normal CHAP authentication. (RFC 3720)
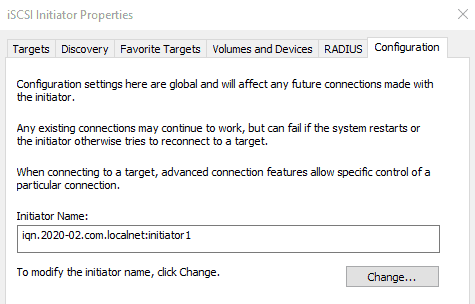
For my Windows Machine I created a new IQN.

Open the iSCSI Initiator app on your windows machine. If the service isn’t running, you can get a warning and an opportunity to start the service.

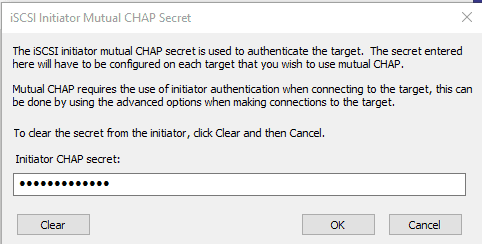
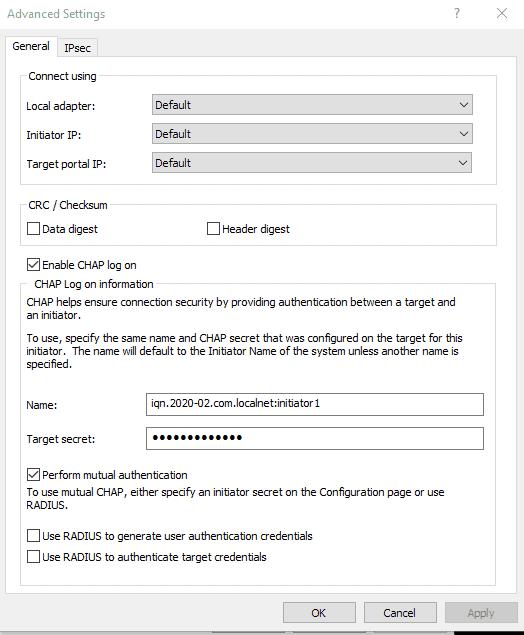
And I configured the Target to use Mutual CHAP Secret. It is not necessary, but I thought : Well, let’s give it a try.
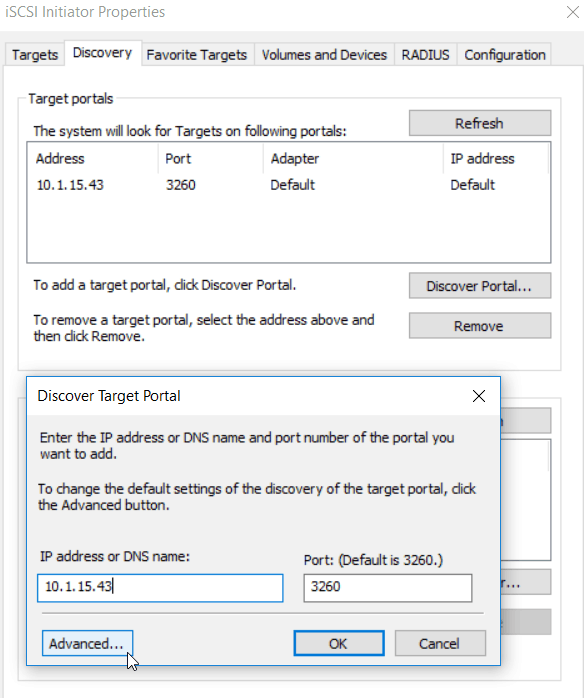
Open the Discovery and click on Discover Portal.
Here you fill in the ip address of the Target and click on Advanced.
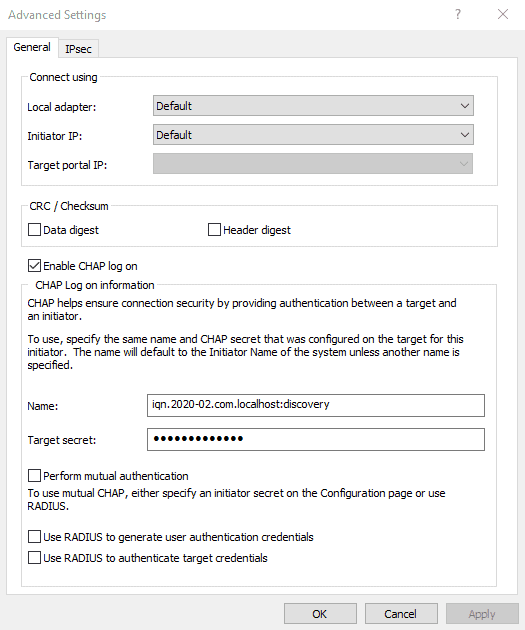
Here you can fill in the CHAP credentials for the discover process.
You will discover some backstores of the Target.
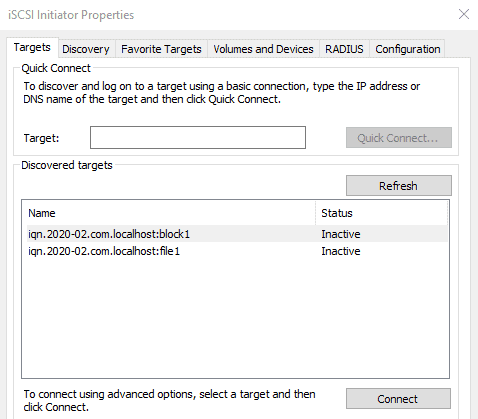
Click on the right one which we configured. (IQN of the windows machine.)
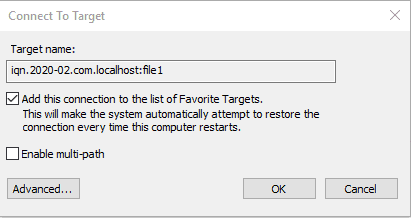
Fill in the CHAP credentials.
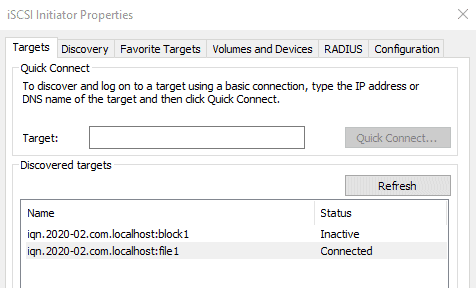
And now the Windows Machine and the Target are connected.
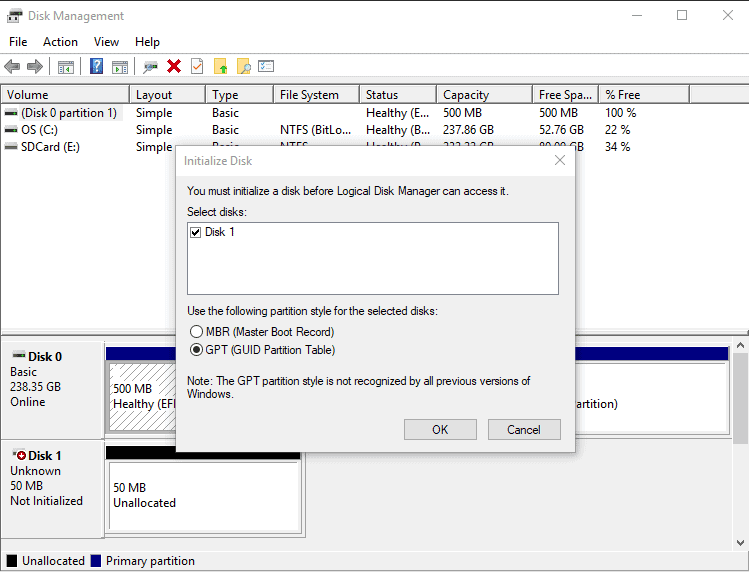
If you go to Disk Management of the windows machine, you will see new disks (In this case the first one is the 50M. The seconds was the 8Gb)

Hooray ! We configured a Linux Target, Linux Initiator, Windows Initiator, Discovery Authentication, one-way Target authentication and mutual Target Authentication.
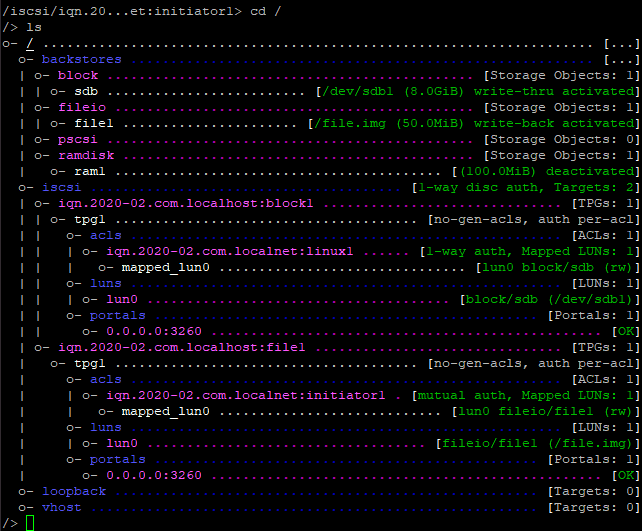
Final TargetCLI configuration
Here are some screenshot of my final TargetCLI configuration.
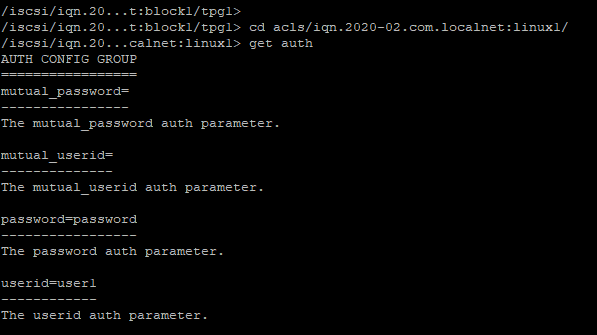
With the get and set command you can see of set parameters.
Enable the IQN authentication at TPG level.
Set the Auth at the IQN level.
iSCSI Terminology.
LUN
Logical Unit Number represents a single addressable iSCSI disk
Target
Server that emulates a backstore to presents it as a LUN to initiators
Target LUN is logical unit itself exported by the target server
ACL
Access control list
IQN
iSCSI Qualified Name is a unique name to identify the iSCSI target server
Iqn:2018-03.com.localnet:maillun
Alias
Optional string up to 255 char describing the target
iSCSI Authentication
Authentication is handled by challenge-handshake protocol CHAP
Modes
CHAP initiator authentication
Mutual CHAP authentication
Demo Mode (Authentication is disabled. Default)
Backstore
Storage resource that backs the LUN
This resource may be :
Entire physical device
Partition
RAID Device
LVM Logical volume
File
Initiator
A client that accesses the LUNs on a target iSCSI server
iSNS
iSCSI Storage Name Service used by an initiator to discover shared LUNs
Node
Single discoverable object on a iSCSI SAN
Portal
Combination of an IP address and port
Default iSCSI listen on port 3260
More storage related links :