For the HyperFlex Container Storage Interface (HX-CSI) you will need a Kubernetes cluster. Here is the start of an image that have the right software on it and which you can clone before configuring Kubernetes.
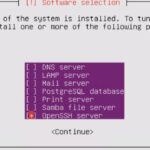
Start with a normal Ubuntu 18.04 installation.
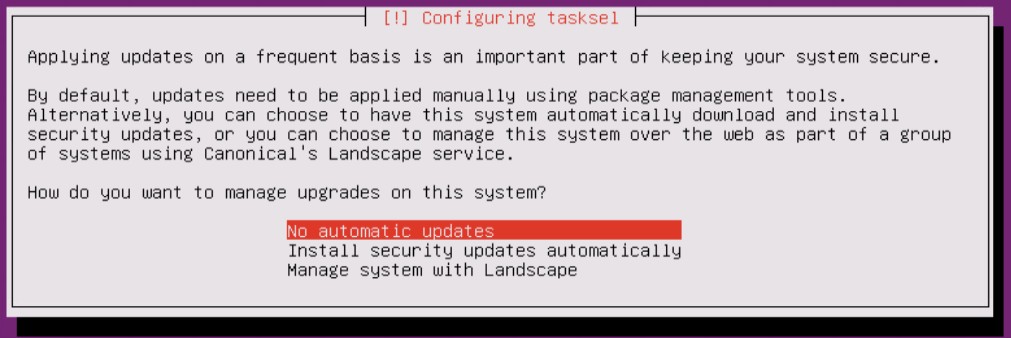
I just want to have certain versions of software and that is why I disable the automatic updates.
During the installation, it’s nice that OpenSSH will be installed and configured so a SSH session to the image is possible.
After the installation, you can login with the user you’d created.
Default there is no root password, so when you configure it, you can easily use it. It’s not recommended, but sometimes it can be very handy.
sudo passwd rootNow Docker and other things can be installed.
sudo apt-get install docker.io -y
sudo apt-get install apt-transport-https -y
Now you can enable and start the Docker Service so that it will run even after a reboot.
sudo systemctl enable docker
sudo systemctl start docker
Verify if the installed Open-iSCSI is the correct version (2.0-874) for HX-CSI with the command :
iscsiadm -VInstall Kubernetes with the native package management
curl -s https://packages.cloud.google.com/apt/doc/apt-key.gpg | sudo apt-key add
sudo apt-add-repository "deb http://apt.kubernetes.io/ kubernetes-xenial main"
Now we can install the correct Kubernetes version for HX-CSI.
sudo apt-get install -qy kubelet=1.18.0-00 kubectl=1.18.0-00 kubeadm=1.18.0-00Make sure to hold it and verify the version.
sudo apt-mark hold kubeadm kubelet kubectl
kubeadm version
It’s always nice to have the VMtools running on the image. The easiest way to do this is :
sudo apt-get install open-vm-toolsYou will need to disable the swap file. The command swapoff -a will do the trick, but after a reboot, it’s there again. The best thing to do is to disable it at the /etc/fstab file.
If you’re creating a “GoldenImage” you can now Shutdown the image:
sudo shutdown -P nowWhen it is powered off, clone it, so you will have a Master and Nodes with the correct software installed. This can save you some time.
Make sure every clone has a different Hostname, IP and iSCSI IQN.
In my case I will have 1 K8S Master and 3 Workers with static ip addresses.
Finalize the Kubernetes installation
On the Master type the following command:
sudo kubeadm init --pod-network-cidr=192.168.0.0/16The command will generate a command with a token (Last line of the output) and some output and there next line should be done on the Master:
mkdir -p $HOME/.kube
sudo cp -i /etc/kubernetes/admin.conf $HOME/.kube/config
sudo chown $(id -u):$(id -g) $HOME/.kube/config
On all the nodes install the Calico-System. This is the L3 Network.
kubectl create -f https://docs.projectcalico.org/manifests/tigera-operator.yaml
kubectl create -f https://docs.projectcalico.org/manifests/custom-resources.yaml
watch kubectl get pods -n calico-system
[UPDATED]
When there is POD to POD traffic, make sure you configure IP in IP encapsulation for cross-traffic in Calico:
apiVersion: projectcalico.org/v3
kind: IPPool
metadata:
  name: ippool-ipip-cross-subnet-1
spec:
  cidr: 192.168.0.0/16
  ipipMode: CrossSubnet
  natOutgoing: true
If you want to have IP in IP encapsulation for inter workload traffic, just change the ipipMode to Always.
Let have all the Workers join the cluster. Use the command seen at the last 2 lines of previous kubeadm init command. The token is each time different.
sudo kubeadm join 10.2.12.220:6443 --token ccbecb.3338kgzn79o6jtre --discovery-token-ca-cert-hash sha256:f0e4e421b82d679c0cb0edbc4d8e112009005785334941f7d391e1cedbeb81a1
To see if everything is running fine use the command :
kubectl get nodes -o wide
More Technical Posts: