Because I am doing a lot of testing it can be rewarding to do a complete re-installation of a Kubernetes cluster. As a result the only thing I disliked was the manual process of the Ubuntu installation.
Here is a procedure to automate a complete Ubuntu installation and customize it.
Requirements
Before you can start, make sure you have already an Ubuntu image running with the correct Ubuntu ISO mounted in the CDROM. Packages will be required before the start of the creation of the ISO.
Kickstart is part of the syslinux-utils.
sudo apt-get update -y
sudo apt-get install system-config-kickstart -y
sudo apt-get install syslinux-utils -y
Copy ISO Files to directory
If you didn’t do so, lets mount the ISO.
sudo mkdir -p /mnt/cdrom
sudo mount /dev/cdrom /mnt/cdrom
The opt dir is for installation files. Therefor we’re creating a directory in /opt and copy the needed files for the new ISO to it.
sudo mkdir /opt/ubuntuiso
sudo cp -rT /mnt/cdrom /opt/ubuntuiso
sudo chmod -R 777 /opt/ubuntuiso
Lets select the language.:
sudo echo en >/opt/ubuntuiso/isolinux/langks.cfg explained
It is easy to create a ks.cfg with the Kickstart GUI. The auto-installation process is using this file.
Lets start with customizing the ks.cfg. The first example is to give the Master image a fixed ip address.
There is the way to give the image a fixed ip address and set the hostname.
#Network information
network --bootproto=static --ip=10.3.12.150 --netmask=255.255.255.0 --gateway=10.3.12.254 --nameserver=10.3.12.10 --device=eth0 --hostname Master150
There is a section to install needed packages. Here is a list which I’m using:
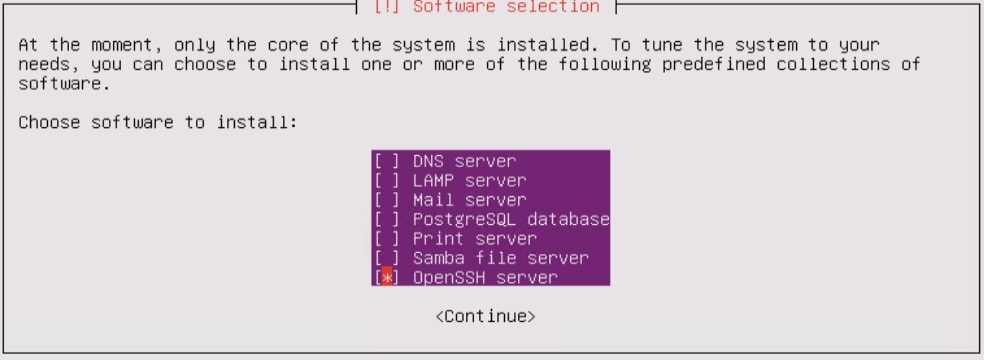
%packages
openssh-server
docker.io
apt-transport-https
open-vm-tools
curl
syslinux
software-properties-common
vim
open-iscsi
After the installation of Ubuntu and the extra packages it is time to adjust the post section with all the things you want to change like enable and start docker, install the right version of Kubernetes, disable the swapfile, enable iscsid with the node.session.scan set to manual.
%post
#!/bin/bash
exec < /dev/tty6 > /dev/tty6
chvt 6
apt-get update
systemctl enable docker
systemctl start docker
curl -s https://packages.cloud.google.com/apt/doc/apt-key.gpg | apt-key add
apt-add-repository "deb http://apt.kubernetes.io/ kubernetes-xenial main"
apt-get install -qy kubelet=1.18.0-00 kubectl=1.18.0-00 kubeadm=1.18.0-00
apt-mark hold kubeadm kubelet kubectl
curl http://10.2.8.3/HX/hxcsi-1.2.rel.4.5.1a.569.git.cc5ea579.tar.gz -o /tmp/hxcsi.tar.gz
sed -i "s/\/swapfile/\#\/swapfile/" /etc/fstab
systemctl enable iscsid
vim -c '%s/node.session.scan = auto/node.session.scan = manual/g' -c 'wq' /etc/iscsi/iscsid.conf
chvt 1
After this installation, which takes about 5 minutes, you can finalize the K8S Master like in explained in the Kubernetes Installation post.
Complete Kickstart ks.cfg
Here is my complete ks.cfg. Adjust the customization for the Workers auto installation ISO.
#Generated by Kickstart Configurator
#platform=x86

#System language
lang en_US
#Language modules to install
langsupport en_US
#System keyboard
keyboard us
#System mouse
mouse
#System timezone
timezone America/Los_Angeles --ntpservers=10.2.8.2
#Root password
rootpw --disabled
#Initial user
user iamjoost --fullname "iamjoost" --iscrypted --password $1$W1IKZSf$msnSQX9wOtM.JUBeVKjuI1
#Reboot after installation
reboot
#Use text mode install
text
#Install OS instead of upgrade
install
#Use CDROM installation media
cdrom
#System bootloader configuration
bootloader --location=mbr
#Clear the Master Boot Record
zerombr yes
#Partition clearing information
clearpart --all --initlabel
#Disk partitioning information
part / --fstype ext4 --size 1 --grow
part /boot --fstype ext2 --size 1000 --asprimary
#System authorization infomation
auth  --useshadow  --enablemd5
#Network information
network --bootproto=static --ip=10.3.12.150 --netmask=255.255.255.0 --gateway=10.3.12.254 --nameserver=10.3.12.10 --device=eth0 --hostname Master150
#Firewall configuration
firewall --disabled
#Do not configure the X Window System
skipx

%packages
openssh-server
docker.io
apt-transport-https
open-vm-tools
curl
syslinux
software-properties-common
vim
open-iscsi

%post
#!/bin/bash
exec < /dev/tty6 > /dev/tty6
chvt 6
apt-get update
systemctl enable docker
systemctl start docker
curl -s https://packages.cloud.google.com/apt/doc/apt-key.gpg | apt-key add
apt-add-repository "deb http://apt.kubernetes.io/ kubernetes-xenial main"
apt-get install -qy kubelet=1.18.0-00 kubectl=1.18.0-00 kubeadm=1.18.0-00
apt-mark hold kubeadm kubelet kubectl
curl http://10.2.8.3/HX/hxcsi-1.2.rel.4.5.1a.569.git.cc5ea579.tar.gz -o /tmp/hxcsi.tar.gz
sed -i "s/\/swapfile/\#\/swapfile/" /etc/fstab
systemctl enable iscsid
vim -c '%s/node.session.scan = auto/node.session.scan = manual/g' -c 'wq' /etc/iscsi/iscsid.conf
chvt 1
ks.pressed
During the installation you will have to press a key. In other words, to emulate this, the ks.pressed file is used.
d-i partman/confirm_write_new_label boolean true
d-i partman/choose_partition \
select Finish partitioning and write changes to disk
d-i partman/confirm boolean true
Prepare the ISO
copy the ks.cfg and ks.pressed to /opt/ubuntuiso
sudo cp ~/ks.pressed /opt/ubuntuiso/.
sudo cp ~/ks.cfg /opt/ubuntuiso/.
Create the ISO from all the files:
sudo mkisofs -D -r -V "ATTENDLESS_UBUNTU" -cache-inodes -J -l -b isolinux
/isolinux.bin -c isolinux/boot.cat -no-emul-boot -boot-load-size 4 -boot-info-ta
ble -o /opt/autoinstall.iso /opt/ubuntuiso
To make the ISO bootable:
isohybrid /opt/autoinstall.isoThe automated installation start:
The ISO can be used for the automated installation.
Just create a VM and put the ISO in the CDROM
After 5 min Ubuntu is installed and the image can be finalized for Kubernetes.
Other technical posts:
- Lorex IP Camera color code
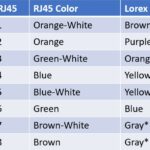 I wanted an IP Lorex camera outside but with a longer cable. For this, I tried to use a waterproof connection. To use this, I had to cut the connector of the Lorex camera, and then the challenge started! Different colors Unfortunately the color’s of the Lorex camera are different compared to a standard network … Read more
 - Preview 4K in Camtasia is not smooth – Solution
 One big problem of Camtasia is the preview of the 4K. It is not smooth, and you only see a couple of frames. It is tough to edit. When I create a video with my GoPro, I am most of the time shooting in 4K even though the videos will be made in 1920×1080. This … Read more
 - Ubuntu Automated Installation (For K8S)
 Because I am doing a lot of testing it can be rewarding to do a complete re-installation of a Kubernetes cluster. As a result the only thing I disliked was the manual process of the Ubuntu installation.Here is a procedure to automate a complete Ubuntu installation and customize it. Requirements Before you can start, make … Read more
 - My First 3D Printer (Ender 3 V2)
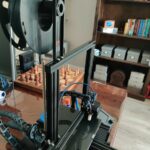 For my “early” birthday, my wife gave me my first 3d printer. An Creality Ender 3 V2. It is a nice printer to start with. Content: Hiccups Changing thing on the 3D printer Upgrading the 3D printer Conclusion Hiccups My first print from the dog, which is on the default SD-Card went without any problems. … Read more
 - License Registration for HyperFlex
 After the installation of HyperFlex, you will have an evaluation period. During this time you have to register the cluster with a valid license. There are features that won’t be running anymore after the evaluation period is over. How to register your HyperFlex cluster? In HyperFlex Connect there is information about the license of the … Read more