In a containerized environment, you need persistent volumes . With HyperFlex 4.5, iSCSI thisis possible. What are the difference between using iSCSI or CSI in a container. Information about Kubernetes Persistent Volumes can be found HERE.
iSCSI can only do: ReadWriteOnce and ReadOnlyMany.
HX-CSI can do both AND also ReadWriteMany. (Block)
There is a very nice installation guide of the HyperFlex CSI, which can be found HERE. I am always learning with hands-on and here is my way of installing the HyperFlex CSI Plugin.
How to configure a Kubernetes cluster can be found HERE.
HyperFlex iSCSI Configuration
Before you can install HX-CSI, HyperFlex iSCSI network must be configured. In the HyperFlex iSCSI Video Serie there is a video with the explanation how it’s working and how to configure it. Please watch those videos before proceeding any further.
Installation of HX-CSI
After the installation of Kubernetes Master, Workers and the HX iSCSI Network Configuration, it is time to install HX-CSI. Download the plugin at www.cisco.com/go/software
Make sure node.session.scan = manual in the /etc/iscsi/iscsid.conf
sudo cat /etc/iscsi/iscsid.conf | grep -i node.session.scanIf it’s not in the file, you will have to put this parameter in the file.
To append this parameter when it’s not in the file:
sudo bash -c 'echo "node.session.scan = manual" >> /etc/iscsi/iscsid.conf'iscsid.conf is a root owned file and to append the echo command, use bash in the command.
If the parameter is set to auto, you can change it, with verification via the command:
sudo vim -c '%s/node.session.scan = auto/node.session.scan = manual/gc' -c 'wq' /etc/iscsi/iscsid.confEnable iscsid and view the status to verify it’s running
sudo systemctl enable iscsid
sudo systemctl status iscsid
Verify if present at the Kubernetes Master Image: –disable-attach-detach-reconcile-sync=true
sudo cat /etc/kubernetes/manifests/kube-controller-manager.yaml | grep -i reconcileAdd it at the command section of the file.
sudo vim /etc/kubernetes/manifests/kube-controller-manager.yamlDownload the HXCSI software from CCO and upload it to the K8S master in the /tmp directory. This can be done via SCP, WinSCP etc.
Extract the image with tar-xf <image name>. New directories will be created.

Copy the HXCSI Image to all workers nodes:
scp ./images/hxcsi-1.2.rel.4.5.1a.569.git.cc5ea579.tar 10.2.12.226:/tmp
Copy all the CSI images to the ALL Kubernetes nodes. I prefer to have those images also been copied to the /tmp of the Master node.
scp ./images/csi* 10.2.12.226:/tmp
On the Kubernetes Worker Nodes, load the HXCSI Image:
sudo docker load --input /tmp/hxcsi-1.2.rel.4.5.1a.569.git.cc5ea579.tar
Now docker load all the other 4 CSI images on ALL kubernetes nodes :
ls -1 /tmp/csi*.tar | xargs --no-run-if-empty -L 1 sudo docker load -i

HXCSI-Setup
Here are the final steps for the HX-CSI and lets start with the HXCSI-Setup. This file do have a lot of parameters.
/tmp/setup/hxcsi-setup
Usage of ./setup/hxcsi-setup:
-clientId string
Client ID for the Tenant
-cluster-name string
k8s cluster name
-helm-chart
generate helm chart for helm install
-hx-csi-image string
HX csi image for the node plugin (default "smitsh/hxcsi:latest")
-iscsi-url string
hx iscsiUrlurl
-output-dir string
Output directory (default "./hxcsi-deploy/")
-password string
password to hx cluster api
-token string
Service Authentication Token
-url string
hx api url
-username stringcc5ea579
user name to hx cluster api
Depending of your configuration, but here is an example of what I used:
./tmp/setup/hxcsi-setup -clientId IAmJoost -cluster-name jvdmadecluster -hx-csi-image -hx-csi-image hxcsi:1.2.rel.4.5.1a.569.git.cc5ea579 -iscsi-url 10.22.24.13 -url 10.2.12.13 -username admin 
A hxcsi-deploy directory will be created with this content:

Deploy HX-CSI with the command:
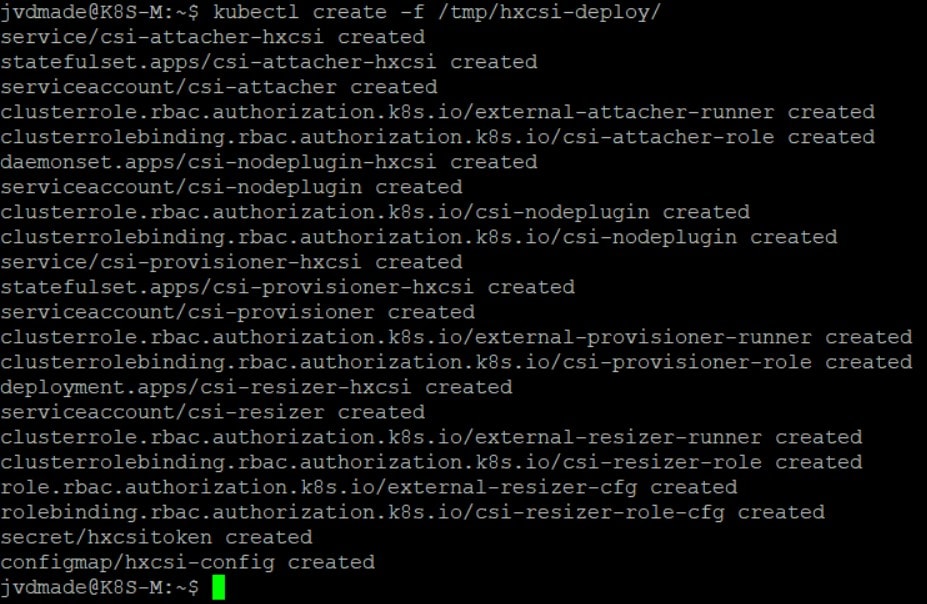
kubectl create -f /tmp/hxcsi-deploy/
kubectl get pods
And that is it! HX-CSI is now installed and can be used.
FREE: Example Directory with Scripts
In the Example Director of the HX-CSI plugin, there are a lot of examples.

kubectl create -f /tmp/examples/sample-hxcsi/

Connect to the Containers bash to see how the volume is mount to the container:
kubectl exec -ti test-647b4c8874-l5g5d -- /bin/bash
The Persistant Volume is, in this case, mounted on the /usr/mnt/test directory. If you write data to it, delete the container, start a new container and link it to this PVC, you still will see the data.
A WordPress Site with HyperFlex CSI
If you want to have a wordpress running in a container, please have a look at the following post:
https://kubernetes.io/docs/tutorials/stateful-application/mysql-wordpress-persistent-volume/
Here are some more HyperFlex / Technical posts:
- Lorex IP Camera color code
 I wanted an IP Lorex camera outside but with a longer cable. For this, I tried to use a waterproof connection. To use this, I had to cut the connector of the Lorex camera, and then the challenge started! Different colors Unfortunately the color’s of the Lorex camera are different compared to a standard network … Read more
 - Preview 4K in Camtasia is not smooth – Solution
 One big problem of Camtasia is the preview of the 4K. It is not smooth, and you only see a couple of frames. It is tough to edit. When I create a video with my GoPro, I am most of the time shooting in 4K even though the videos will be made in 1920×1080. This … Read more
 - Ubuntu Automated Installation (For K8S)
 Because I am doing a lot of testing it can be rewarding to do a complete re-installation of a Kubernetes cluster. As a result the only thing I disliked was the manual process of the Ubuntu installation.Here is a procedure to automate a complete Ubuntu installation and customize it. Requirements Before you can start, make … Read more
 - My First 3D Printer (Ender 3 V2)
 For my “early” birthday, my wife gave me my first 3d printer. An Creality Ender 3 V2. It is a nice printer to start with. Content: Hiccups Changing thing on the 3D printer Upgrading the 3D printer Conclusion Hiccups My first print from the dog, which is on the default SD-Card went without any problems. … Read more
 - License Registration for HyperFlex
 After the installation of HyperFlex, you will have an evaluation period. During this time you have to register the cluster with a valid license. There are features that won’t be running anymore after the evaluation period is over. How to register your HyperFlex cluster? In HyperFlex Connect there is information about the license of the … Read more