Specialized applications can need to read/write directly to a block device. The main use case are databases. A filesystem is more “human-readable” and it adds extra overhead. Instead of the filesystem, block devices are chosen more often. More information about Kubernetes can be found HERE.
After the installation of Kubernetes and the HyperFlex Container Storage Interface, you can proceed with this post.
Storage Class YAML File
I am using the default Storage Class of the HX-CSI example directory. Nothing fancy.
kind: StorageClass
apiVersion: storage.k8s.io/v1
metadata:
    name: csi-hxcsi-default
provisioner: csi-hxcsi
parameters:
    datastore: default-ds
    datastoreSize: "-1"
Persistent Volume Claim YAML File.
After creating the Storage Class, create a PVC as a Block Device with ReadWriteMany because different containers wants to read and write to the same shared storage.
apiVersion: v1
kind: PersistentVolumeClaim
metadata:
name: demo-block-rwx
spec:
storageClassName: csi-hxcsi-default
volumeMode: Block
accessModes:
- ReadWriteMany
resources:
requests:
storage: 10Gi
Deployement YAML File
In this example I’m using the Ubuntu container image. Because it’s a block device, devicePath is now used instead of volumeMount.
apiVersion: apps/v1
kind: Deployment
metadata:
name: demo-block
labels:
app: demo-block
spec:
replicas: 1
selector:
matchLabels:
app: demo-block
template:
metadata:
labels:
app: demo-block
name: demo-block
spec:
volumes:
- name: blockvolume
persistentVolumeClaim:
claimName: demo-block-rwx
containers:
- name: demo-block
image: ubuntu
command: [ "/bin/bash", "-c", "--" ]
args: [ "while true; do sleep 30; done;" ]
ports:
- containerPort: 22
volumeDevices:
- devicePath: /dev/block
name: blockvolume
When the SC, PVC and the container are deployed, verification if everything is working can be done.
To verify if the block device connected in the container:
kubectl exec demo-block-757cfdc75c-59dbz -- bash -c "ls -l /dev/"total 0 brw-rw---- 1 root disk 8, 32 Mar 11 19:48 block lrwxrwxrwx 1 root root 11 Mar 11 19:21 core -> /proc/kcore lrwxrwxrwx 1 root root 13 Mar 11 19:21 fd -> /proc/self/fd crw-rw-rw- 1 root root 1, 7 Mar 11 19:21 full drwxrwxrwt 2 root root 40 Mar 11 19:21 mqueue crw-rw-rw- 1 root root 1, 3 Mar 11 19:21 null lrwxrwxrwx 1 root root 8 Mar 11 19:21 ptmx -> pts/ptmx drwxr-xr-x 2 root root 0 Mar 11 19:21 pts crw-rw-rw- 1 root root 1, 8 Mar 11 19:21 random drwxrwxrwt 2 root root 40 Mar 11 19:21 shm lrwxrwxrwx 1 root root 15 Mar 11 19:21 stderr -> /proc/self/fd/2 lrwxrwxrwx 1 root root 15 Mar 11 19:21 stdin -> /proc/self/fd/0 lrwxrwxrwx 1 root root 15 Mar 11 19:21 stdout -> /proc/self/fd/1 -rw-rw-rw- 1 root root 0 Mar 11 19:21 termination-log crw-rw-rw- 1 root root 5, 0 Mar 11 19:21 tty crw-rw-rw- 1 root root 1, 9 Mar 11 19:21 urandom crw-rw-rw- 1 root root 1, 5 Mar 11 19:21 zero
There is a /dev/block and you can see it’s a block device, because the first letter on the line is a “b”
Let’s write some data on the block device:
kubectl exec demo-block-757cfdc75c-59dbz -- bash -c "echo "I_Am_Joost_._com" | dd conv=unblock of=/dev/block"Verify what is written on the storage device:
kubectl exec demo-block-757cfdc75c-59dbz -- bash -c "od -An -c -N 20 /dev/block"jvdmade@K8S-M:~$ kubectl exec demo-block-757cfdc75c-59dbz -- bash -c "od -An -c -N 20 /dev/block" I _ A m _ J o o s t _ . _ c o m
It is possible to create some Replica’s, but I want to have a complete “new” server connect to this RWX Block device, so I’ve created another deployment. Basically it’s the same YAML file, but with different names.
Here you see the Server2-demo pod is running:
jvdmade@K8S-M:~/block$ kubectl get pods
NAME READY STATUS RESTARTS AGE
csi-attacher-hxcsi-0 2/2 Running 0 3d21h
csi-nodeplugin-hxcsi-2w4cg 2/2 Running 2 3d21h
csi-nodeplugin-hxcsi-h2pfz 2/2 Running 2 3d21h
csi-nodeplugin-hxcsi-vcbjq 2/2 Running 2 3d21h
csi-provisioner-hxcsi-0 2/2 Running 0 3d21h
csi-resizer-hxcsi-7979549b8f-wh58n 2/2 Running 0 3d21h
demo-block-757cfdc75c-59dbz 1/1 Running 0 2d23h
server2-block-fcd48df5-4tctb 1/1 Running 0 15s
test-647b4c8874-l5g5d 1/1 Running 0 3d20h
To see if the block device is really has the same content of the other container:
kubectl exec server2-block-fcd48df5-4tctb -- bash -c "od -An -c -N 16 /dev/block"And the result is what the other container wrote to the device.
I _ A m _ J o o s t _ . _ c o m
Via Server2 we’re going to overwrite this data:
kubectl exec server2-block-fcd48df5-4tctb -- bash -c "echo "This_Is_Server_2_Writing_Something_To_The_Block_Device" | dd conv=unblock of=/dev/block"Lets see if the content can be read from the other server with the command:
kubectl exec demo-block-757cfdc75c-59dbz -- bash -c "od -An -c -N 75 /dev/block"And here is the result:
T h i s _ I s _ S e r v e r _ 2
_ W r i t i n g _ S o m e t h i
n g _ T o _ T h e _ B l o c k _
D e v i c e \n \0 \0 \0 \0 \0 \0 \0 \0 \0
\0 \0 \0 \0 \0 \0 \0 \0 \0 \0 \0
Hooray! It’s working.
Here are other HyperFlex / Technical Posts:
- Lorex IP Camera color code
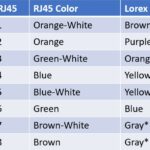 I wanted an IP Lorex camera outside but with a longer cable. For this, I tried to use a waterproof connection. To use this, I had to cut the connector of the Lorex camera, and then the challenge started! Different colors Unfortunately the color’s of the Lorex camera are different compared to a standard network … Read more
 - Preview 4K in Camtasia is not smooth – Solution
 One big problem of Camtasia is the preview of the 4K. It is not smooth, and you only see a couple of frames. It is tough to edit. When I create a video with my GoPro, I am most of the time shooting in 4K even though the videos will be made in 1920×1080. This … Read more
 - Ubuntu Automated Installation (For K8S)
 Because I am doing a lot of testing it can be rewarding to do a complete re-installation of a Kubernetes cluster. As a result the only thing I disliked was the manual process of the Ubuntu installation.Here is a procedure to automate a complete Ubuntu installation and customize it. Requirements Before you can start, make … Read more
 - My First 3D Printer (Ender 3 V2)
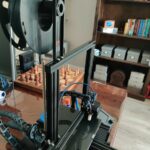 For my “early” birthday, my wife gave me my first 3d printer. An Creality Ender 3 V2. It is a nice printer to start with. Content: Hiccups Changing thing on the 3D printer Upgrading the 3D printer Conclusion Hiccups My first print from the dog, which is on the default SD-Card went without any problems. … Read more
 - License Registration for HyperFlex
 After the installation of HyperFlex, you will have an evaluation period. During this time you have to register the cluster with a valid license. There are features that won’t be running anymore after the evaluation period is over. How to register your HyperFlex cluster? In HyperFlex Connect there is information about the license of the … Read more